
Here the link to my reference library
Category Archives: Reference
Liz Wolfe
While looking for example of juxtaposition, I found this amazing canadian photographer Liz Wolfe
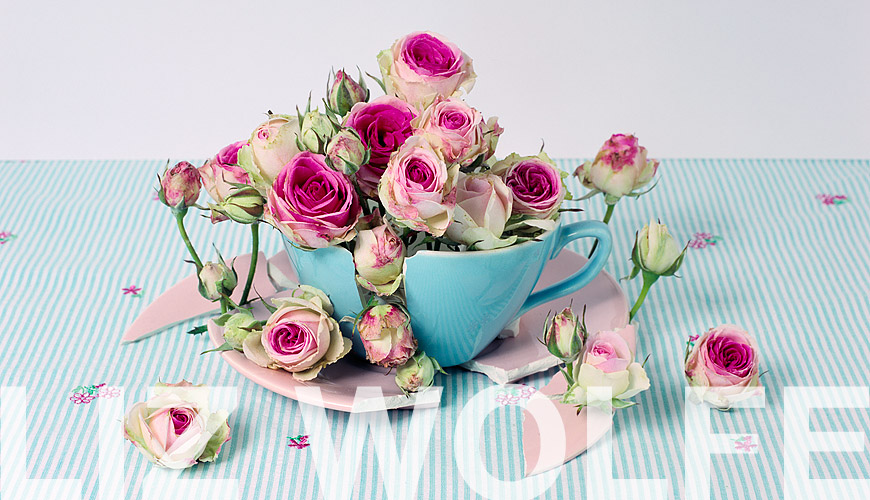

The welcome page is a very colourful photograph
with a little creepy side to it. The cup cake looks
so yummy but … wait …. some cricket …
yurk lol

There is the cute fake cat with … coloured
fudge and … It just bring your brain to over
think and that is what fascinate me.

An other shot that I really like was this
puncture hand with a candy cane and
coloured sugar blood. hahaha
Speedlight setting test
At this point I start to realize how much lighting is important. For this reason I wanted to search further and experiment with my flash. So far the only things I have done with these were to place them in a softbox while my subject was quite often in a lightbox … yep I was scared of overexposing but now, I definitely understand light much better.
Here is a test that I have done while playing with the setting. Pretty useful for my own reference at least.

Automatic

No Flash

2.0-28ft / -3.0EV 10mm + diffusor

3.0-46ft / -3.0EV 16mm
4.8-66ft / -3.0EV 70mm

2.0-24ft / +0.3EV 70mm + diffusor

2.0-14ft / +0.3EV 16

2.0-8.9ft / +0.3EV 10mm + diffusor

2.0-9.5ft / +3.0EV 70mm
Must Go List
Serindia Gallery
Opening Hours: 11am-8pm, Tuesdays-Sundays (Mondays by appointment)
How to get there: Serindia Gallery is easily reachable by BTS; Saphan Taksin
Address: OP Garden 4, 6 Soi Charoen Krung 36, Unit 3101, 3201, Charoen Krung Road, Bangrak, Bangkok
Kathmandu Photo Gallery
Opening Hours: 11:00 – 19:00 (Tuesday – Sunday)
How to get there: Five minutes walk from either Surasak or Chong Nonsi skytrain stations.
Address: Kathmandu Photo Gallery, 87, Pan, off Silom road Rd., Si Lom, Bang Rak, Bangkok
La Lanta Fine Art
Opening Hours: 10:00 – 19:00 (Tuesday – Saturday), Sunday by appointment
How to get there: From BTS Skytrain Phrom Phong Station (exit 5), walk towards asok and turn right into Soi 31. Continue on for approx. 500 metres until you see the main intersection. Turn left, and the gallery is on your right (about 20 metres from the intersection)..
Address: 245/14 Sukhumvit soi 31, Klongtan Nua, Wattana, Bangkok
Bkk Art & Cultural Centre
Opening Hours: 10:00-21:00, Closed Monday
How to get there : BTS National Stadium
Address: Khlong Pho Land, 170/17 Moo 7, Soi 2, Khlong Pho Rd., Sala Thammasop, Thung Kru, Bangkok 10170
Queen’s Gallery
Opening Hours: 10:00 – 19:00; closed on Wednesdays
How to get there: Taxi is the best way to get there.
Address: 101 Ratchadamnoen Klang Road (near Phan Fah Bridge)
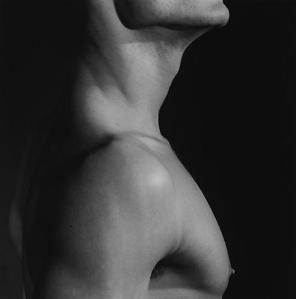
Robert Mapplethorpe
Today, I have visit the online gallery of the very controversial, Robert Mapplethorpe (November 4, 1946 – March 9, 1989). He first start his studies in drawing, painting and sculpture in 1963 until his life change when he got his first Polaroid in 1970.
I’m a very open mind person but even, I have been chocked by some of my further research. I will start with reviewing what I have seen on the gallery itself.
What I really like about this artist is the composition of his photographs and a very contrasting black and white for most of the artwork. Some of my favorite photograph would be the following.
 Ajitto, 1981
This is most definitely in my top two. This is a very emotional and nostalgic photograph of a strong black man is a very sensible moment.
 Denis, 1978
I liked this picture for it’s high contrast and light work. this photograph is much more strong and masculine that the preview one.
 Isabelle, 1988
An other of my favorite shot is this sad Isabelle, melancholic and dramatic. I love the high contrast, it work very nicely with the context. There is some implied line from the eyes fixing the floor.
 Thomas, 1987
My second favorite photograph is this one. I love how Robert used the tunnel to create a unique shot. I love the accents on the musculature
Robert Mapplethorpe’s work can be seen all over the world in different museum and exhibition. This month only we can see some of his artwork in canada, US, UK and Spain. More exposition will be coming in february in Japan, Scotland and Belgium.
I wanted to learn a little bit more about this photographer, more than what was found on his Fondation website… There is a wide collection of sexual oriented photograph, some of them can be very artistic, but other are just …. on the extreme side of sexuality taboo. After reflection I think it was a big mistake. I don’t have issue about skin color, sexual opinion, and weird practice .. Do what ever you want, the way you want it … but I have a problem with nude kids in this context.
I strongly recommend his fondation and to take a look at his portfolio on the same website, but I would not recommend to search more deeper…
Credit: None of the picture here are mine. They are all own by Mapplethorpe Fondation.
It’s reading day !
Today I have few new book that I would like to go thru:
Of course today will just look at them quickly, mostly to get a wide view from the author so later when it will be needed I can go back knowing where to found the information. So anyway I got my hand on a copy of the well known series of book; Basic Photography by David Prakel, lighting, exposure, composition and black & white.
My first impression was … wow, very nicely made book ! The setup is very clear. 


some excellent educational reading
I took few day off to take some time reading books that I just got.
– Digital Nature Photography and Adobe Photoshop by Kevin Moss
This book is a very good investment for any level in photography. The author has really well combined all the aspect of nature photography from the right gear to take out in the field to monitor calibration, editing and manipulation of the photograph. The 300+ pages are very well separated in section such : Landscape, wildlife, abstract, close-up and macro.
I also tought it would be important for me to understand the lighting as I do a lots of still-life and studio shot.
– Light, Science & Magic, an introduction to photographic Lighting by Fil Hunter, Steven Biver and Paul Fuqua. (4e edition)
That book is simply amazing ! This is a book that every student should have in there possession. It is an other 300 pages book with a LOTS of example and diagram. They will take 4-6 different shots with a schema of the same subject to show you the different setup with light. It start very slowly with the principle of light and color. It follow with the management of reflection and family of angles. They do show great example how to reveal the shape ans surface. There is also two separate chapiter on how to deal with metal and glass.
I have read this book to be able to fully understand a part of photography that I’m really interesting in; Close-up
– Understanding close-up photography by Bryan Peterson.
This book is really full of informations but I found it a little bit more difficult to navigated. This 160 pages book is full of great shot but it is writing way too small. There is a good range of info about different equipment and setup.
I have also recently started a bank of different images for my own use and inspiration.
RAW vs. JPEG
by Darren Rowse
A Raw file is…
• not an image file per se (it will require special software to view, though this software is easy to get).
• typically a proprietary format (with the exception of Adobe’s DNG format that isn’t widely used yet).
• at least 8 bits per color – red, green, and blue (12-bits per X,Y location), though most DSLRs record 12-bit color (36-bits per location).
• uncompressed (an 8 megapixel camera will produce a 8 MB Raw file).
• the complete (lossless) data from the camera’s sensor.
• higher in dynamic range (ability to display highlights and shadows).
• lower in contrast (flatter, washed out looking).
• not as sharp.
• not suitable for printing directly from the camera or without post processing.
• read only (all changes are saved in an XMP “sidecar” file or to a JPEG or other image format).
• sometimes admissable in a court as evidence (as opposed to a changeable image format).
• waiting to be processed by your computer.
In comparison a JPEG is…
• a standard format readable by any image program on the market or available open source.
• exactly 8-bits per color (12-bits per location).
• compressed (by looking for redundancy in the data like a ZIP file or stripping out what human can’t perceive like a MP3).
• fairly small in file size (an 8 megapixel camera will produce JPEG between 1 and 3 MB’s in size).
• lower in dynamic range.
• higher in contrast.
• sharper.
• immediately suitable for printing, sharing, or posting on the Web.
• not in need of correction most of the time (75% in my experience).
• able to be manipulated, though not without losing data each time an edit is made – even if it’s just to rotate the image (the opposite of lossless).
• processed by your camera.
These differences lead implicitly to situations that require choosing one over the other. For instance, if you do not have much capacity to store images in camera (because you spent all your money on the camera body) then shooting in JPEG will allow to capture 2 or 3 times the number you could shooting in Raw. This is also a good idea if you are at a party or some other event afterwhich you want to share your photos quickly and easily.
On the other hand, if capacity is not an issue at all (1 GB and 2 GB flash cards are getting cheaper every week) you might consider shooting in Raw + JPEG, just to cover all the possibilities. If you cannot or do not want to do any post processing, then you simply have to shoot in JPEG. Taking a picture in Raw is only the first step in producing a quality image ready for printing. If, on the other hand, quality is of the utmost importance (like when you are shooting professionally), and you want to get every bit of performance your DSLR can offer then you should be shooting in Raw.
That being said, I know many professional photographers who do not shoot in Raw for one of two reasons: 1.) they don’t know how, or 2.) they don’t want to take the time to process the images afterwards.
Shooting in JPEG
When you shoot in JPEG the camera’s internal software (often called “firmware” since it’s part of the hardware inside your camera) will take the information off the sensor and quickly process it before saving it. Some color is lost as is some of the resolution (and on some cameras there is slightly more noise in a JPEG than its Raw version).
The major actor in this case is the Discrete Cosine Transforamtion (or DCT) which divides the image into blocks (usually 8×8 pixels) and determines what can be “safely” thrown away because it is less perceivable (the higher the compression ration/lower quality JPEG, the more is thrown away during this step). And when the image is put back together a row of 24 pixels that had 24 different tones might now only have 4 or 5. That information is forever lost without the raw data from the sensor recorded in a Raw file.
The quality of a JPEG taken with a DSLR will still be far better than the same shot taken with a top-of-the-line point-n-shoot camera that is as old as your DSLR. If your camera can burst (shoot continuously for a few seconds) you’ll actually be able to shoot more shots using JPEG than Raw because the slowest part of the whole process is actually saving the file to your memory card – so the larger Raws take longer to save.
Shooting in Raw
If you do shoot in Raw, your computer rather than the camera will process the data and generate an image file form it. Guess which has more processing power: your digital camera or your computer? Shooting in Raw will give you much more control over how your image looks and even be able to correct several sins you may have committed when you took the photograph, such as the exposure.
To take advantage of this you will certainly need to use some software on your computer to process the files and produce JPEGs (or TIFFs). I have found the Camera Raw that comes with Adobe Photoshop CS2 to be very good at processing Raw files (even batch processing them), though everybody has their favorite (RawShooter has a lot of fans). When you load a Raw file using Adobe Photoshop CS2 the Camera Raw dialog will automatically pop up. Most of the time the automatic settings are fairly decent, but you have the chance to change the white balance, exposure, contrast, saturation, and even calibration of the red, green, and blue guns or correct for lens abberation – all lossless.
If the white balance is off I have found that it is much easier to fix using the Camera Raw screen than loading the JPEG and manipulating that – the end result is much better as well. The richness, detail (sharpness), color range and ability to adjust these settings end up being so much greater with a Raw file, even though what a Raw file looks like before processing is anything but rich and sharp. As a side note, all of my work that uses creative coloring was colored using the white balance settings in the Camera Raw dialog.
Part of the conversion to JPEG are sharpening algorithms and as a result, the unprocessed Raw file is less sharp. Two things can affect this, one is the brand of camera (Nikon cameras are generally considered sharper, but this is not true across all models) and the other factor is the user settings for sharpening in the camera. Loading a Raw file in a program such as Adobe Photoshop CS2 will automatically apply white balance, sharpening, constrast, brightness, etc… and can even batch process Raw files. I often use this feature as a first pass and then go back and adjust the settings if needed. This is espeacially helpful because even if I did everything correct in camera when I took the photo and my conversion software was able to use the full processing power of my desktop computer, the conversion to JPEG could still trick the camera or my computer and only my eye can produce the correct while balance, constast, brightness, etc…
What software is good to use with Raw?
• Microsoft RAW Image Thumbnailer and Viewer for Windows XP (essential for Windows based photographers)
• Picasa (Free!)
• Adobe Photoshop CS or CS2
• RawShooter Premium (recently bought by Adobe)
• ACD See (for Digital Asset Management)
• Portfolio Extensis 8 (for Digital Asset Management)
• iView Media Pro (DAM, recently bought by Microsoft)
• BreezeBrowser Pro (DAM, I also love their Downloader Pro for use with my card readers)
• Adobe Lightroom (beta)
• Capture One
• IrfanView
• DXO Optics Pro
• Picture Window Pro
• the software that came with your camera
• more software comes out all the time…
Considerations
There are a few other issues to worry about when shooting in Raw, such as color space (Adobe 1998 vs. sRGB). I’ve used both color spaces, but sRGB is closer to most ink jet, pigment, and lab printers (the place where I get my photos printed requires sRGB). If you want all 12-bits of color (as opposed to the 8-bits of a JPEG) you will need to store your image as a TIFF.
Some people will also convert their proprietary Raw files (with extensions like .CRW, .CR2, .NEF, etc..) into the Adobe digital negative format (.DNG) to make sure those files will be readable in the far flung future. I have yet to spend the time doing this because I haven’t seen the need. For archival, however, consider getting gold DVDs because the gold lining lasts 50 – 100 years (much longer than the maximum of about 25 years for silver lined DVDs or CDs). Keep more than one backup if your images are important (and keep the second backup at a different location, such as the house of a friend or relative).
When it comes to your photography, however, you are the ultimate decision maker on what is best. I recommend that, if you haven’t, you play with the Raw format. You certainly won’t harm yourself or your camera. In fact, a great test is to go out just to shoot somehting (even just in the backyard or around the block). Shoot several photographs under various lighting conditions using the Raw + JPEG setting on your DSLR (if it has that capability). Take them back to your computer and compare after processing the Raw files. Take into consideration your time in doing so and see if the gain is worth your extra time.
by Darren Rowse
Lenses test for macro shot
So as I said earlier, I wasn’t sure what to use for macro photographs. I have run few tests and I had some surprises.
First of all, here is the stat for my 4 lenses:
70-200mm (macro)
| Minimum focus | 1.4 m |
| Maximum magnification | 0.13 x |
18-105 mm
| Minimum focus | 0.45 m |
| Maximum magnification | 0.16 x |
50 mm
| Minimum focus | 0.45 m |
| Maximum magnification | 0.15 x |
35 mm
| Minimum focus | 0.30 m |
| Maximum magnification | 0.16 x |
I sticked on the wall, a piece of paper with small word on it. I take the shot as close as I could from my subjet everytime.
The 35 mm had better performance than the 50mm.
I also tried the 35 mm with macro convertor that give me a very impressive clear image. BUT a huge distorsion in the corner, almost like a fish eye. I think it can give a good artistic look in some specific picture or I would need to crop the subjet (something to keep in mind while shooting.) Am I going to use it … maybe I will give this 50$ close up lens a try, we will see.
The 18-105 … forget about it, it was horrible. and the tones of colors was changing a lot. The issue of light in the captor start to be a problem.
My only “macro” capable lens is the 70-200. The whole picture was very clear. No vignetting or blur, nothing. The problem is the distance between the subject and myself. So I had a 2x teleconverter to get closer without moving. Again the main issue is the light.
I have read a little bit about it and found out that a ringflash can help with that issue. So I decided to give it a try. I made a ringflash !!! It cost nothing and I had the chance to experiment !
Alexander Rodchenko
Wow
I’m impressed by his work ! This Russian artist, who lived between 1891-1956 did really had a great talent ! Rodchenko was among the most talented and well known artist during the revolution.
From 1918 to 1921 was at the art school, doing a program of abstract painting and sculpture. He stopped painting in 1921 to explore new field of design; photography and photocollage.
What really amaze me, is about the analyzing part to come up with a shocking point of view in each picture. He wrote “One has to take several different shots of a subject, from different points of view and in different situations, as if one examined it in the round rather than looked through the same key-hole again and again.”
Alexander Rodchenko was more concentrate on documentary photography but he was also very versatile. His first photomontage illustrated Mayakovsky’s poem, “About this”, in 1923.
In the 1930 his style changed to a more documentary, less abstract art. He returned painting in the late 1930’s to finally stopped photographing in 1942.


Fire Escape,1925 Pioneer Girl, 1930
